Severe weather across Alabama can strike in an instant. This leaves your home exposed to severe water damage. If your property just experienced severe storm damage, learning how to cover a damaged roof with a tarp is vital.
To tarp a roof properly, clean the damaged area first. Then, unroll a heavy-duty waterproof tarp so it extends over the roof ridge. Finally, secure the edges using wooden strips ($2\times4$ boards) screwed tightly into the roof structure. Never nail screws directly through the tarp fabric without wood anchor strips. Doing so will cause immediate, severe leaking. This temporary roof protection after a storm prevents water intrusion until a professional roofing contractor can perform a permanent roof leak repair.
At Reliable Service Roofing, located at 2700 Corporate Drive Suite 200, Birmingham, Alabama 35242, we witness the devastation of local wind and hail damage firsthand. While a temporary roof tarp installation is an effective emergency roof leak tarp solution, executing it safely requires the right materials, clear instructions, and strict attention to safety warnings. This complete step-by-step roof tarping guide details everything homeowners need to know about professional roof tarp installation methods, costs, and insurance parameters in 2026.
Quick Reference: What is the Proper Way to Tarp a Roof?
Before diving into the physical instructions, you must understand the rules of proper temporary roofing solutions explained by local experts.
The Over-the-Ridge Rule
A waterproof tarp must always run up and over the peak (ridge) of the roof. This rule applies if the damage sits anywhere near the upper slope. If you stop the tarp mid-slope without wrapping it over the peak, rainwater will simply slide down the shingles. It will seep right under the top edge of the tarp. This creates a major interior emergency roof leak.
The Anchor Board Rule
You should never attempt to fasten a tarp by driving roofing nails or staples directly through the plastic fabric alone. High-velocity Alabama winds will rip the tarp away within hours. Instead, wrap the tarp fabric tightly around wooden strips ($2\times4$ or $1\times2$ wood boards). Then, anchor the wood directly into the roof decking.
Is roof tarping a temporary fix?
Yes, roof tarping is exclusively a temporary roof repair. It is meant to offer emergency roof leak protection for a limited time frame. This buys you time while you coordinate a permanent restoration and navigate your homeowners insurance claims.
Tools and Materials Needed to Tarp a Roof
To implement an effective DIY emergency roof tarping for homeowners project, you must gather professional-grade materials. Using weak, low-quality house supplies will inevitably lead to structural failure during subsequent rains.
Essential Equipment Checklist
- Heavy-Duty Waterproof Tarp: Look for a thick, woven polyethylene tarp. Silver, brown, or heavy blue colors work best. Choose a high mil-thickness rating of at least 10 mil to 15 mil.
- Wooden Strips: Gather several long $2\times4$ or $1\times2$ lumber boards. These act as anchor battens to pin the tarp down tightly.
- Exterior Wood Screws: Use $2.5\text{-inch}$ to $3\text{-inch}$ heavy-duty deck screws. These secure the wooden strips tightly through the shingles and into the plywood roof decking.
- Cordless Power Drill: Use a reliable driver for driving screws quickly and efficiently into structural timber.
- Utility Knife / Heavy Shears: Use this tool to cut the heavy-duty waterproof tarp to the precise dimensions needed.
- Safety Harness & Fall Protection: Use a high-quality roofing safety harness. Anchor it firmly to prevent catastrophic slips.
- Extension Ladder: Use a ladder properly rated to extend at least 3 feet past your roof’s eave line.
- Protective Gear: Wear durable work gloves and safety glasses. These protect against loose fiberglass granules, splintering wood, and sharp roofing nails.
What Size Tarp Do I Need for My Roof?
A common mistake is choosing a tarp that only covers the exact square footage of the physical hole or missing shingles.
Expert Tip: Your tarp must extend at least 4 feet past the damaged zone in all directions (left, right, and bottom). It must also wrap completely over the roof ridge by at least 2 to 3 feet. If your structural wind damage covers a $6\times6\text{ foot}$ section, you will need a minimum tarp size of $15\times20\text{ feet}$ to ensure full waterproof overlap and adequate anchor room.

Step-by-Step Instructions for Roof Tarping
If conditions are safe and you choose to install a roof tarp yourself, follow these detailed, field-tested steps. They ensure your temporary roof tarp installation holds up against intense weather conditions.
Photo Documentation for Insurance
Before touching anything, take clear, high-resolution photographs and videos of the storm damage protection zone. Document missing shingles, shattered flashing, tree limb punctures, and interior ceiling water spots. This step is imperative for your insurance provider. You must show the original state of the destruction to your insurance adjuster to validate your subsequent storm restoration insurance claim documentation.
Clearing Debris and Inspecting the Surface
Carefully remove any fallen tree branches, shattered shingle fragments, loose leaves, and moss from the affected zone. The surface of the shingles must be completely clear of debris. This allows the wooden strips to lay perfectly flat against the roof structure, creating a proper water intrusion prevention seal.
Measuring and Cutting the Tarp Fabric
Measure the total span of the exposed area. Unroll your heavy-duty waterproof tarp on the ground or a flat lawn area. Cut the tarp to length using your utility knife. Remember to include the mandatory 4-foot overlap buffer on all sides. Also add the extra length required to wrap completely over the roof peak.
Rolling the Fabric Around Anchor Boards
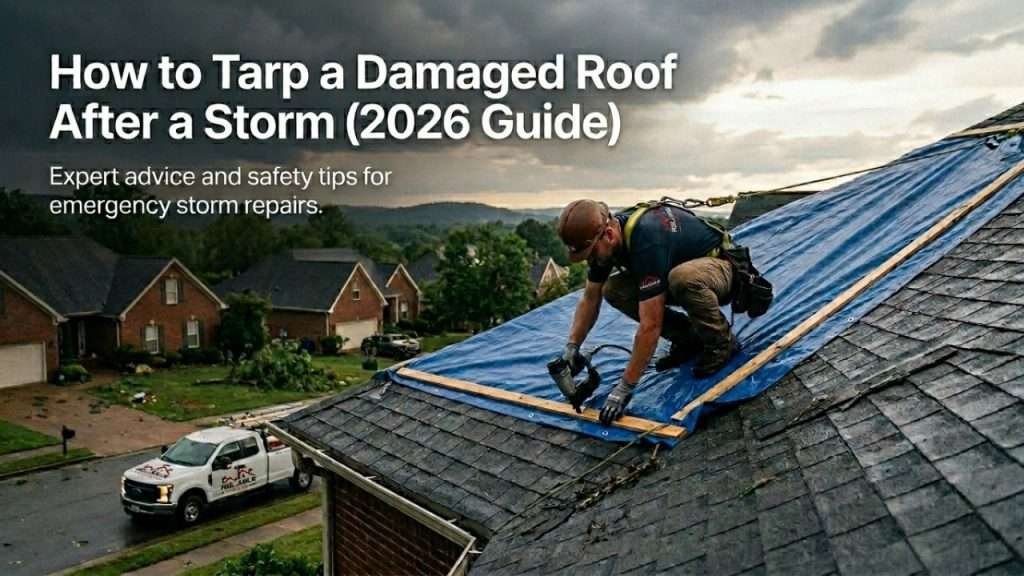
Take your first $2\times4$ wooden board and lay it across the top end of the tarp. Roll the tarp tightly around the board at least two full rotations. This process rolls the fabric into the wood. It distributes the wind’s pulling force evenly across the entire board rather than putting all the stress on individual screw heads. Repeat this exact rolling process on the bottom edge of the tarp with another board.
Positioning and Smoothing the Tarp
With the help of an assistant, carefully carry the rolled tarp up the ladder. Always use absolute fall safety precautions. Lay the top wrapped wood board over the peak of the roof so it sits securely on the opposite, undamaged side of the roof slope. Pull the remaining fabric down flat across the damaged area. Smooth out all large wrinkles or air pockets that could catch high winds like a sail.
Driving Fasteners Into the Roof Decking
Using your cordless power drill, drive your $2.5\text{-inch}$ or $3\text{-inch}$ exterior wood screws through the tarp-wrapped wooden boards. Drive them down through the shingles and directly into the structural plywood roof decking underneath. Space your screws roughly 10 to 12 inches apart along the entire length of the board.
Securing the Vertical Perimeter Flaps
To finish your temporary roof tarp installation, place additional wooden strips down the left and right vertical edges of the tarp. Screw these side anchor boards down securely. This creates a fully enclosed perimeter box around the damage. It ensures driving rain cannot blow horizontally under the sides of the fabric.
Professional Roof Tarp Installation Methods vs. DIY
Can I tarp my roof myself? While DIY emergency roof tarping for homeowners is physically possible for single-story structures with flat pitches, professional emergency roofing services offer clear advantages.
Side-by-Side Comparison
| Feature / Detail | DIY Roof Tarping Steps | Professional Roof Tarping Methods |
| Safety Equipment | Standard ladders, often lacking proper professional harness tie-offs. | Full OSHA-compliant safety harness rigs, specialized roof anchors. |
| Material Quality | Retail-grade blue tarps (often thin 5-7 mil plastic that tears quickly). | Professional-grade 12-15 mil woven UV-treated waterproof tarps. |
| Fastening Precision | Common nails or staples that frequently cause secondary leaks. | Heavy-duty exterior deck screws with dense wood batten structures. |
| Longevity | Typically lasts 1 to 2 weeks before wind tearing occurs. | Engineered to last 30 to 90+ days without structural failure. |
| Liability / Warranty | Homeowner bears total financial risk for accidental falls or further leaks. | Fully licensed, insured, and backed by company workmanship safety guarantees. |
Homeowners frequently make critical mistakes when attempting a DIY patch. These include using thin tape to hold a tarp down or nailing screws directly into open valleys. These choices inadvertently introduce severe secondary interior leaks, which can complicate your ultimate insurance claim settlement.
Cost of Emergency Roof Tarping in 2026
If you opt to avoid the profound safety risks of climbing a ladder, hiring a professional roofing contractor to deploy an emergency roof tarp is a smart investment.
Average Professional Price Points in Birmingham AL
In the 2026 local market, the cost of emergency roof tarping ranges depending on the size of the target zone, roof pitch, and time of day:
- Minor Specialized Tarping ($10\times10\text{ ft}$ section): $350 to $650.
- Moderate Structural Tarping ($20\times20\text{ ft}$ section): $650 to $1,200.
- Large-Scale or Severe Structural Mitigation: $1,200 to $2,500+.
- After-Hours Emergency Premium: Tarping during a severe storm breakout at 11:00 PM on a weekend will generally add an emergency trip charge of $150 to $350 to the baseline installation labor fees.
Insurance Coverage Parameters
Yes, almost all standard homeowners insurance policies fully cover the cost of emergency roof tarping. Insurance providers categorize emergency tarping under your policy’s “Mitigation Duties.” As a property owner, you are legally required by your insurance contract to take immediate, reasonable actions to prevent further secondary damage to your home after an insurable loss occurs.
If you fail to tarp a leaking roof and allow a minor wind damage spot to turn into a massive interior ceiling collapse days later, your insurance company can legally deny coverage for the subsequent mold restoration and drywall damage. By hiring a professional to deploy an emergency roof leak tarp, you simply save your invoices and submit them directly to your insurer for full reimbursement, often bypassed directly through your comprehensive storm claim framework.
How Long Can a Roof Tarp Stay On?
A roof tarp is designed solely as a short-term shield, not a permanent roof covering.
Longevity Parameters
- Standard Blue Retail Tarps: 2 to 3 weeks before intense UV rays degrade the plastic.
- Professional Weatherproof Tarps: 30 to 90 days under normal regional conditions.
How long should a roof tarp remain in place?
Ideally, your roof tarp should stay on your structure no longer than 30 to 60 days. While high-grade tarps can mechanically keep water out for several months, prolonged exposure traps dark humidity and heat underneath the plastic fabric. In the hot, humid environment of Central Alabama, this trapped condensation creates a breeding ground for wood-rotting fungus and mold growth on your underlying roof decking.
Always use your tarping timeline to aggressively coordinate with your roofing contractor for a permanent shingle installation, metal panel restoration, or a full storm restoration replacement.
Serving Our Local Communities Across the Birmingham Area
Operating actively from our central commercial location at 2700 Corporate Drive Suite 200, Birmingham, Alabama 35242, the field crews at Reliable Service Roofing are ready to mobilize immediate emergency roof protection guide services across the entire metro landscape. We don’t just limit our rapid-response operations to downtown Birmingham; we provide comprehensive storm damage protection across both Jefferson and Shelby Counties.
Our active local service range includes the following communities and surrounding neighborhoods:
- Birmingham (Core Metro Area)
- Hoover: Rapid emergency tarp deployments along the crowded Highway 31 and I-65 municipal corridors.
- Vestavia Hills: Safeguarding multi-story residential designs across elevated ridge lines vulnerable to high-velocity straight-line wind damage.
- Mountain Brook: Premium material care and rapid structural protection for historic estate designs.
- Homewood: Fast roof leak repair and quick-response tarping for dense urban neighborhoods.
- Pelham & Alabaster: Reliable emergency roof leak tarp installations for growing residential sectors.
- Trussville: Quick-turnaround storm damage emergency roof protection guide operations along the I-59 pathway.
No matter your neighborhood layout, our local experts understand how our regional micro-climates, tall pine trees, and sudden tornado watches alter the structural demands of temporary roof protection after a storm.
Proactive Storm Prevention and Roof Maintenance Tips
While knowing how to install a roof tarp is a fantastic emergency skill, preventing the need for one through structural maintenance is always the superior financial approach. Consider these expert tips to keep your roof intact before severe weather patterns arrive:
- Trim Heavy Tree Canopies: Ensure all branches from large oak or pine trees are cut back at least 8 to 10 feet from your shingles to eliminate wind-snapped limb punctures.
- Replace Loose Shingles Instantly: If a localized roof inspection reveals a few curling or unsealed asphalt shingles, address them before a high-wind storm uses those small gaps to lift entire sections off your roof.
- Clean Gutters Diligently: Clogged gutter systems cause intense water back-ups under your lower roof eave lines during heavy rains, leading to rotten roof decking and interior water spots even without major structural wind loss.

When to Call a Professional in Birmingham
It can be difficult to gauge whether a DIY tarping attempt is appropriate or if it is time to call in certified experts. Review this checklist to determine the best course of action for your home.
Signs You Need to Call a Professional Immediately
- Extreme Roof Steepness: Your roof pitch is steep ($7:12$ or greater) or contains multiple stories, making walking without commercial safety rigs inherently lethal.
- Large Puncture Vulnerabilities: A massive tree limb or external flying debris has physically cracked or shattered your underlying structural rafters and support beams.
- Widespread Hail Damage: Your roof is covered in thousands of soft hail impact fractures, which require a massive, multi-square tarp application that single retail sheets cannot cover.
- Active Lightning Hazards or Ongoing Storms: The severe weather pattern is still actively discharging rain and lightning across your local neighborhood.
- Physical Limitations: You do not possess the precise tools, heavy-duty deck screws, or physical assistance required to pull a heavy 15 mil tarp taut over a high ridge.
Why Choose Us for Emergency Roof Tarping in Birmingham
When severe storms tear through your community, you need an honest, responsive partner who can secure your property without delay. Homeowners trust Reliable Service Roofing because:
- True Local Authority: Based right here on Corporate Drive, we respond rapidly to local weather emergencies with fully stocked service trucks.
- Insurance Claim Experience: We build comprehensive, itemized damage documentation that matches exactly what insurance adjusters require, paving the way for smooth claims processing.
- Uncompromising Safety: Our crews are trained in OSHA-compliant fall protection systems, ensuring zero added liability or damage to your property during the emergency roof tarping process.
- Seamless Transitions to Permanent Repair: We don’t just leave you with a tarp. We specialize in comprehensive structural roof leak repair, premium shingle matching, and full high-quality storm restorations.
Take Immediate Action to Protect Your Property
Do not let an open roof leak destroy your home’s framing, insulation, and personal keepsakes. If your property has sustained hail or wind damage, our local team is standing by to deliver secure, heavy-duty emergency protection.
Explore our dedicated Birmingham Roof Repair Services to view our full capabilities, or contact our team right now to request emergency roof tarping services from true local professionals. Let us protect what matters most.
FAQ
You must document the storm damage, clear away loose shingle debris, roll your heavy-duty waterproof tarp around wooden anchor strips, pull the fabric over the roof ridge line, and secure the boards directly into the decking using long exterior wood screws.
Your target tarp must extend a minimum of 4 feet past the boundaries of the damaged shingles on all sides and must wrap completely over the top ridge peak by at least 2 to 3 feet to prevent water from running underneath the plastic.
Professional roof tarping usually ranges from $350 to $650 for minor localized spots, and from $650 to $1,200+ for large sections requiring advanced safety setups or after-hours emergency calls.
Yes, standard homeowners insurance policies fully cover professional emergency roof tarping costs under your policy’s mandatory damage mitigation clause, provided the underlying issue was caused by an insurable peril like wind or hail.
A high-grade, professionally installed roof tarp can remain on a structure safely for 30 to 60 days, but it should be replaced with permanent roofing materials as soon as possible to avoid trapping moisture and causing mold growth on the decking.
While you can tarp a single-story or flat-pitch roof yourself if conditions are clear, hiring a professional contractor is highly recommended for multi-story properties, steep slopes, or severe structural damage due to extreme fall hazards.
You must wrap the ends of the waterproof tarp around solid $2\times4$ or $1\times2$ wooden strips and drive screws through the wrapped wood directly into the decking, rather than driving nails through loose tarp material which quickly tears and leaks.